Overview #
In this guide, you’ll learn how to install an Apache web server on your Ubuntu 22.04 server and setup a virtual host.
For Free SSL please follow this tutorial
Step 1 — Installing Apache #
sudo apt update
sudo apt install apache2
Step 2 — Adjusting the Firewall to allow Apache web server #
sudo ufw allow 'Apache'Step 3 — Checking your Web Server #
sudo systemctl status apache2

● apache2.service - The Apache HTTP Server
     Loaded: loaded (/lib/systemd/system/apache2.service; enabled; vendor prese>
     Active: active (running) since Tue 2022-04-26 15:33:21 UTC; 43s ago
       Docs: https://httpd.apache.org/docs/2.4/
   Main PID: 5089 (apache2)
      Tasks: 55 (limit: 1119)
     Memory: 4.8M
        CPU: 33ms
     CGroup: /system.slice/apache2.service
             ├─5089 /usr/sbin/apache2 -k start
             ├─5091 /usr/sbin/apache2 -k start
             └─5092 /usr/sbin/apache2 -k start
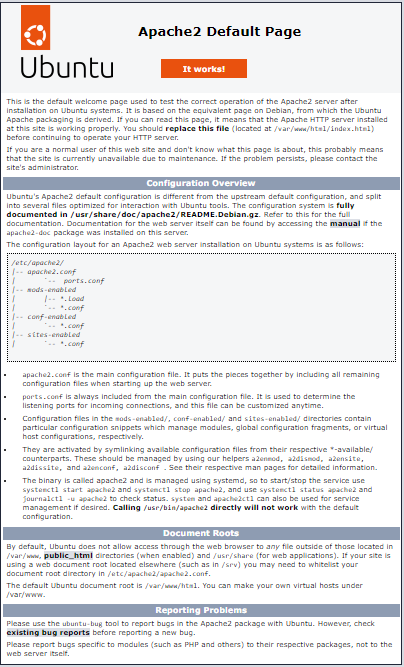
Test if your Apache is working correctly by opening your IP in your browser. You should see the default Ubuntu 22 Apache web page as in the below screenshot

This page indicates that Apache is working correctly. It also includes some basic information about important Apache files and directory locations.
Step 4 — Setting Up Virtual Hosts (Recommended) #
Apache on Ubuntu 22.04 has one server block enabled by default that is configured to serve documents from the /var/www/html directory. While this works well for a single site, it can become unwieldy if you are hosting multiple sites. Instead of modifying /var/www/html, create a directory structure within /var/www for a your_domain site, leaving /var/www/html in place as the default directory to be served if a client request doesn’t match any other sites.
Create the directory for your_domain as follows:
sudo mkdir /var/www/your_domainNext, assign ownership of the directory to the user you’re currently signed in as with the $USER environment variable:
sudo chown -R $USER:$USER /var/www/your_domain
The permissions of your web root should be correct if you haven’t modified your umask value, which sets default file permissions. To ensure that your permissions are correct and allow the owner to read, write, and execute the files while granting only read and execute permissions to groups and others, you can input the following command:
sudo chmod -R 755 /var/www/your_domain
Next, create a sample index.html page using nano or your favorite editor:
sudo nano /var/www/your_domain/index.html
Inside, add the following sample HTML:
<html>
    <head>
        <title>Welcome to Your_domain!</title>
    </head>
    <body>
        <h1>Success!  The your_domain virtual host is working!</h1>
    </body>
</html>
Save and close the file.
In order for Apache to serve this content, it’s necessary to create a virtual host file with the correct directives.
sudo nano /etc/apache2/sites-available/your_domain.confAdd in the following configuration block, which is similar to the default, but updated for your new directory and domain name:
<VirtualHost *:80>
    ServerAdmin webmaster@localhost
    ServerName your_domain
    ServerAlias www.your_domain
    DocumentRoot /var/www/your_domain
    ErrorLog ${APACHE_LOG_DIR}/error.log
    CustomLog ${APACHE_LOG_DIR}/access.log combined
</VirtualHost>
Notice that we’ve updated the DocumentRoot to our new directory and ServerAdmin to an email that the your_domain site administrator can access. We’ve also added two directives: ServerName, which establishes the base domain that will match this virtual host definition, and ServerAlias, which defines further names that will match as if they were the base name.
Save and close the file when you are finished.
Now enable the file with the a2ensite tool:
sudo a2ensite your_domain.confDisable the default site defined in 000-default.conf:
sudo a2dissite 000-default.confNext, test for configuration errors:
sudo apache2ctl configtest
. . .
Syntax OK
Apache will now be serving your domain name. You can test this by navigating to http://your_domain, where you will see something like the following:
Success! The your_domain virtual host is working!
Conclusion #
Now that you have your web server installed, you have many options for the type of content you can serve and the technologies you can use to create a richer experience.


