Overview #
This article explains how to set up passwordless login with PuTTY.
These instructions can also be used to create and assign SSH keys to an admin/root user on a Dedicated Server.
If VPS/Dedicated server is visible over the Internet, you should use public key authentication instead of passwords, if at all possible. This is because SSH keys provide a more secure way of logging in compared to using a password alone. While a password can eventually be cracked with a brute-force attack, SSH keys are nearly impossible to decipher by brute force alone. With public key authentication, every computer has (i) a public and (ii) a private “key” (two mathematically-linked algorithms that are effectively impossible to crack).
Creating a key pair #
- Open the puttygen.exe file you downloaded when configuring PuTTY. You’ll use this to create your private/public keypair.
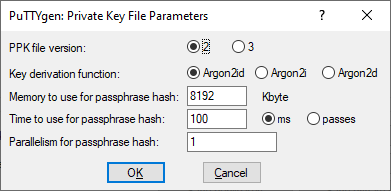
- In the PuTTY Key Generator box, make sure the radio button at the bottom is selected for RSA. In the Top menu click Key -> Parameters for Saving Key files -> Select 2 next to PPK file version
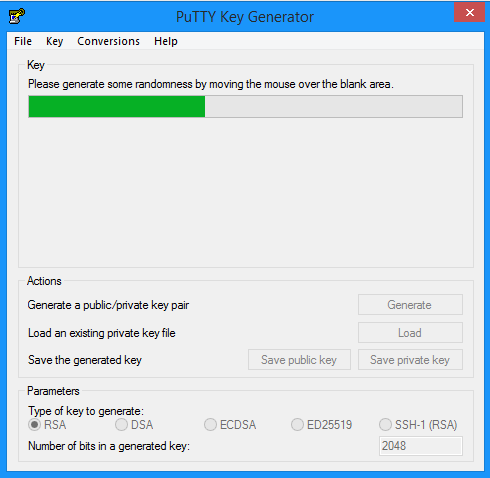
- Click the Generate button.
- Move your mouse around the box to help generate the keys. Once the key is created, a new pop-up box appears:
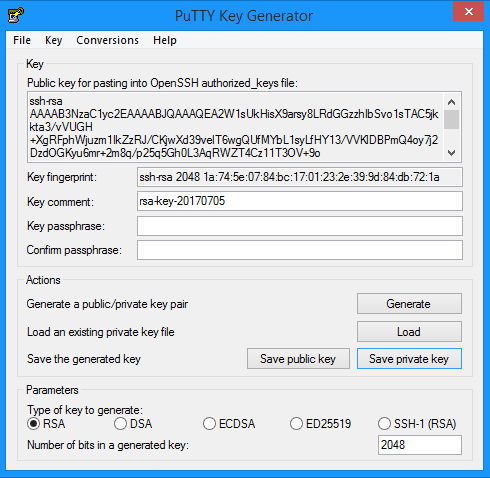
- On the bottom right, there are buttons named Save public key and Save private key – save both to your computer.
- When you save the public key, name it something like Cloudfanatic-Publickey. Do not manually add the extension as that isn’t necessary.
- When you save the private key, name it something like Cloudfanatic-Privatekey and be sure to save it in a secure location on your computer. Again, do not manually add the extension as that isn’t necessary.
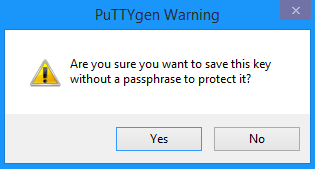
- When saving, you are prompted with a message about a passphrase. Click Yes to save without a passphrase.
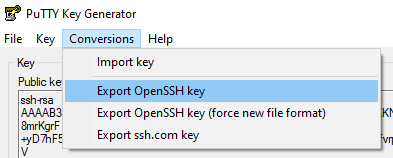
Creating SSH keys for MySQL Workbench #
If you’re creating a key pair for MySQL Workbench, you must export the private key in OpenSSH format.
- Click the Conversions tab and select Export OpenSSH key
- Save this to your computer without an extension.
You can now use this key to import into MySQL Workbench.
Uploading the public key to your server #
- Upload the public key you just created to your Cloudfanatic user’s home directory. You can use an FTP client such as Filezilla to do this.
- Log into your Cloudfanatic vps server through PuTTY.
- Navigate to your user’s /home directory.
[CloudfanaticVPS]$ cd ~- Create an /.ssh directory by running this command:
[CloudfanaticVPS]$ mkdir .ssh- Change the permissions on this directory to 700.
[CloudfanaticVPS]$ chmod 700 .ssh- While still in your user’s home directory, append the public key you just uploaded to a new file named authorized_keys which is located in the /.ssh directory by running this command:
[CloudfanaticVPS]$ ssh-keygen -i -f Cloudfanatic-Publickey >> ~/.ssh/authorized_keysThis appends the Cloudfanatic-Publickey you uploaded from your home computer into a new file named authorized_keys. Just make sure the name of the public key file in the command is the name of the file you uploaded.
- Adjust permissions by running this command:
[CloudfanaticVPS]$ chmod 600 ~/.ssh/authorized_keys- Then remove the original Cloudfanatic-Publickey file:
[CloudfanaticVPS]$ rm Cloudfanatic-PublickeyNow the key sits on the server (protected from access by others)
- Log out of PuTTY and start the program up again.
- When the program restarts, open the configuration box and click the Connection > Data category on the left.
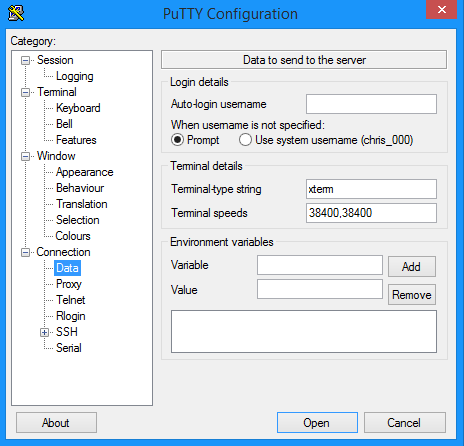
- Enter your Cloudfanatic username (by default username it’s: root) in the first field which is named Auto-login username.
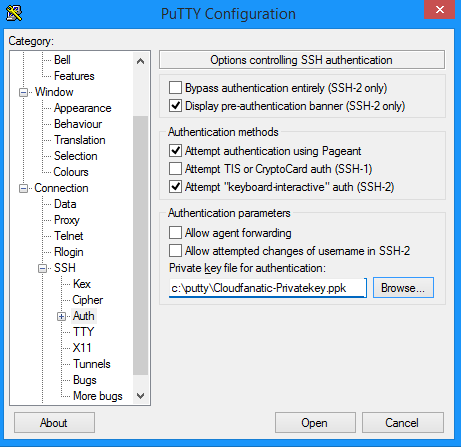
- In the same configuration box, click Connection > SSH > Auth.
- Click the Browse button and navigate to the location on your computer where you saved your Cloudfanatic-Privatekey file.
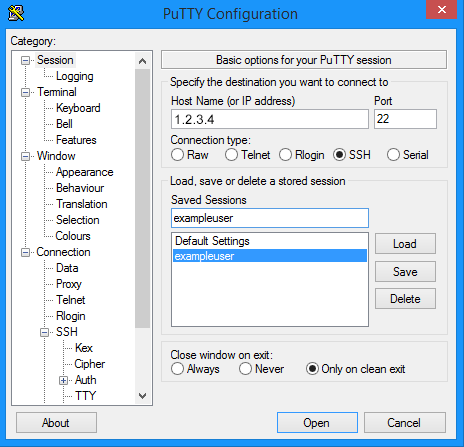
- Click the Session category at in teft menu at the very top and enter the your server info.
- Host Name: 1.2.3.4 (This is your Cloudfanatic vps IP address)
- Port: 22 (this is the default SSH port unless you have changed it)
- Connection Type: SSH
- Click the Open button. You should now be logged in to your server without a password prompt.
Disable password authentication via SSH #
- Edit the file /etc/ssh/sshd_config in your Cloudfanatic vps:
vi /etc/ssh/sshd_config- Find ChallengeResponseAuthentication and set to No
- Find PasswordAuthentication set to No
- Find UsePAM and set to No
- Find PermitRootLogin and set to No
- Save and close the file
- Reload the SSH server:
[CloudfanaticVPS]$ systemctl reload sshConclusion #
And there you have it, password authentication for SSH is now disabled. Your server will only accept key based login and the root user can not login with password.


