This article applies to Standard Instances only.
For 10Gbps Cloud server please follow this article.
In this article we will show you how to control your Cloudfanatic cloud instance. From this page you have full control over your server, including functions that can cause irreversible data loss. Let’s begin:
Overview #
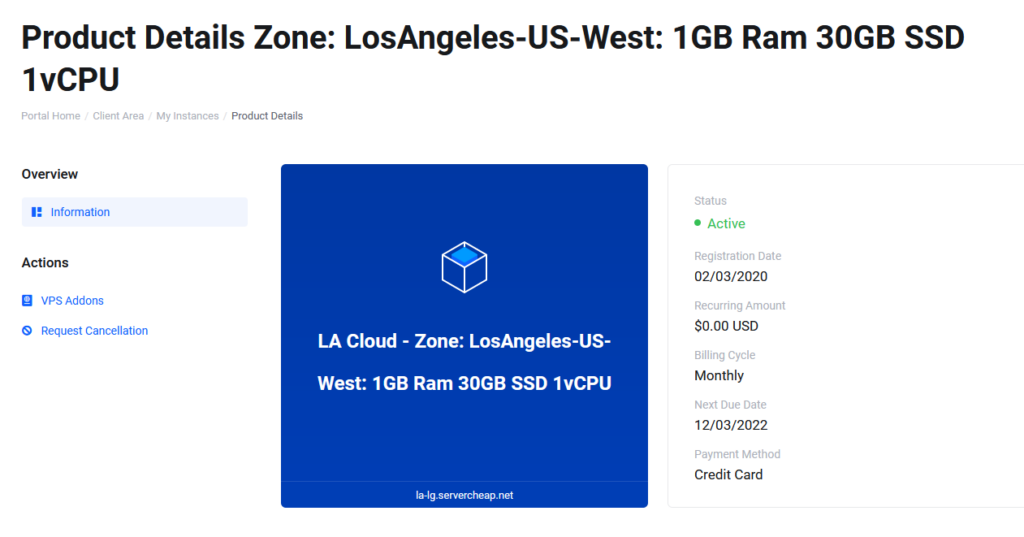
At the top and in the middle of the page in the blue box you have a quick overview of the billing details of your cloud instance. At the top you have your cloud instance name:
Zone: LosAngeles-US-West: 1GB Ram 30GB SSD 1vCPU
From the name we see two important properties:
- The datacenter/location of the server – Los Angeles
- The specs of the server – 1GB Ram, 30GB Disk Space, 1vCPU
To the right of the blue box we have a quick overview of the billing details:
- Status Active indicates our instance is in good Billing standing
- Registration date indicates when we purchased the instance
- Recurring Amount indicates how much the instance costs
- Billing Cycle indicates how often we pay for our instance
- Next Due Date indicates when we need to pay next for our instance
- Payment Method indicates the way you pay for your instance
To the left of the blue box you have two additional options:
- VPS Addons option will provide an overview of the available addons you can purchase for your instances.
- Request Cancellation link allows you to cancel your instance.
Server Functions #
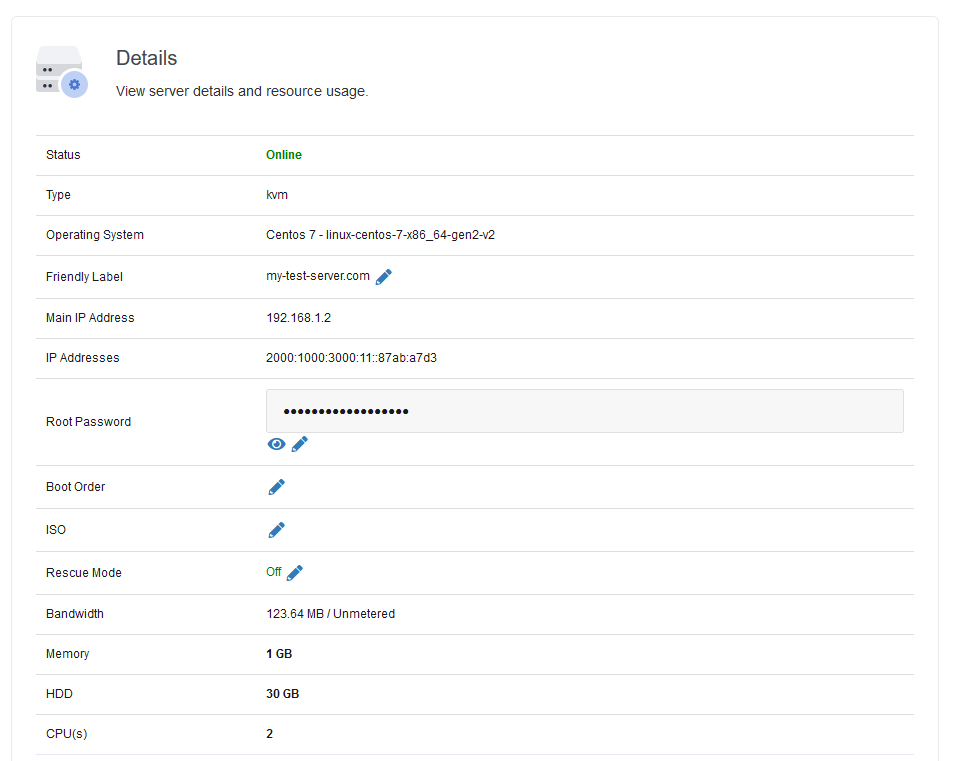
Continuing below we have our cloud instance functions:
- Status Online indicates our instance is booted up
- Type indicates the virtualization technology on your instance
- Operating system indicates the current operating system of your instance
- Friendly label is a random name generated for you by our system upon sign up. This label is there so you can easily find your desired instance in your main dashboard in case you have many instances. You can change it to anything you wish by clicking the Pen icon next to it. It will not make any changes inside your server.
- Main IP Address is the primary IP address of your server. It is assigned to your server automatically by our system upon sign up and can not be changed. This is the address you would use to SSH into your server.
- IP Addresses will contain any additional ipv4 and or ipv6 addresses you have purchased.
- Root Password contains your default password for username root. It is randomly generated secure password. This is the password you would use to SSH into your server for the first time with username: root. You are free to change it to whatever you wish as long as it is secure. Please use at least 10 character with lowercase, uppercase, numbers and special characters. If you forget your root password at any time, you can reset it by clicking the Pen icon next to it. This will cause our system to reboot your server and generate a new random password. The process will take about 2 minutes.
- Boot Order indicates the device your server will boot from. By default all server will boot from your server disk where the operating system is installed. You would want to change your boot order only if you are mounting an ISO image and you wish to boot your server from it for manual installation. Please note in order for the boot order change the be applied to your server, you must click the Reboot button below. To change the boot order, simply click the Pen icon next to it.
- ISO gives you the ability to mount an ISO image and boot your server with it for manual installation. You can mount/unmount ISO by clicking the Pen icon next it. This option should be used with the above Boot Order option as well. Please note in order for the ISO mounting or unmouting to be applied to your server, you must click the Reboot button below.
- Rescue mode gives you the ability to perform self-service/repairing downed virtual machines. Rescue mode boots your virtual machines into a minimal install of linux/livecd. Here you can either repair the virtual machine, or backup your data for restoration. To enable rescue mode click the Pen icon next to it and follow the screen.This option is only recommended for advanced users.
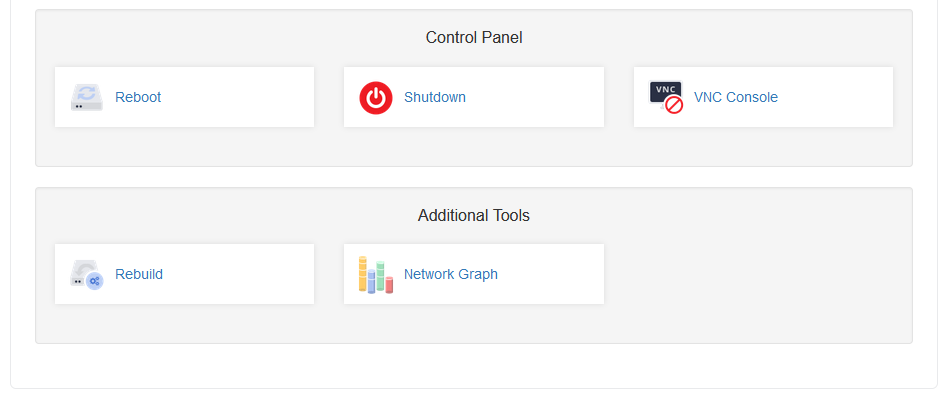
- Reboot button will initiate an ACPI reboot of your instance. Depending on the processes running inside your server, it can take up to 120 seconds.
- Shutdown will initial an ACPI shutdown of your instance. Depending on the processes running inside your server, it can take up to 120 seconds.
- VNC Console will open a pop-up window and will connect you directly to your instance. It is a great way to troubleshoot your server in case you have made changes to it which are now preventing you from accessing your server over the internet. Please note the VNC Console is not meant to be used as a primary method of accessing your server, which should always be SSH, as there are limitations to it such as the inability to copy/paste into it. This of the VNC Console as you have a keyboard and monitor directly plugged in to your cloud instance.
- Rebuild button will take you to a separate page from which you can rebuild/reinstall your server with the operating system of your choice. The Rebuild process is destructive and will erase everything inside your server. This operation once started, can not be undone. Please use with caution. For a list of rebuild options please click here.
- Network Graph will give you a simple overview of your network transfer.


